
Generating Sequence Overlap Alignments
Step 1: Introduction
This tutorial will take you through the steps involved in looking for an alignment between two DNA sequences that are to be used to build a larger sequence. This tutorial uses the Find Overlaps tool, which is designed to look for dove-tail (end-to-end) alignments.
This tutorial assumes the user has already reviewed at least Tutorial 1 and has a basic knowledge of the program.
We will use Genome Workbench to review alignments and how to visually inspect annotations on two sequences in an alignment.
Step 2: Selecting Sequences to Align
Use the data Search View to import the sequences to be aligned. For this search, you should use the following settings:
- Search Tool: Search NCBI Public Databases
- Database: Nucleotide
-
Find what: AC040978.8, AC115836.5

Select all the items, right-click, and choose Add to project from the context menu. The click Ok in the Add to Project dialog.
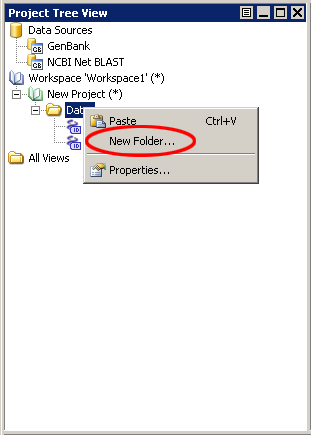
Now there's a 'New Project' in the Project Tree View. Let's create a folder called Sequences in a our project, and add both sequences to this folder.
Right click (or control click on the Mac OS) on the 'Data' label and choose 'New Folder' from the contextual menu. In the New Project Folder dialog that appears, names the folder Sequences.
Then, let's put our sequences in the Sequences folder. This can be done by either selecting the sequences, right clicking and choosing Cut. Then selecting the Sequences folder and right clicking and choosing Paste. Or, just select the sequences and using drag and drop, move them.
You can rename projects by selecting the project (green folder named 'New Project' in the project tree), right-clicking, and selecting Properties. Rename this project to: AC040978.8_AC115836.5_alignment.

Step 3: Generating an Alignment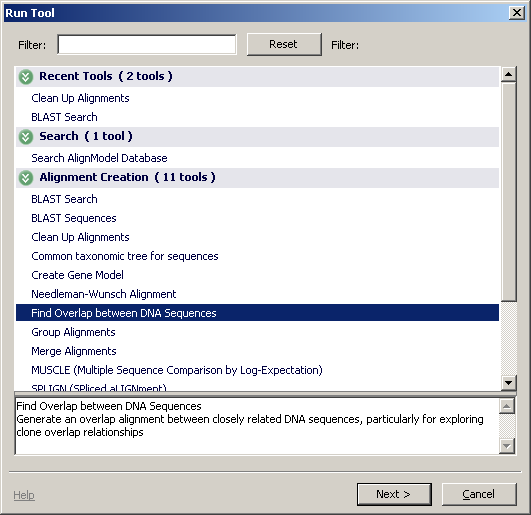

We will generate a specialized alignment for these two sequences - an overlap alignment. This alignment expresses the relationship seen between two clones assembled  sequentially in a tiled BAC assembly.
Select both sequences within the project tree. Then select Tools-> Run Tool from the main menu. In the Run Tool dialog, choose Find Overlap between DNA Sequences and click Next.
In the dialog that  opens, select AC040978.8 as Sequence 1 and AC115836.5 as Sequence 2. Use the default alignment parameters for this alignment, and select Next. Then choose Add to an existing Project and click Finish.
When the alignment is complete, a new icon will appear in the Project Tree View.
Note: The Find Overlaps tool first looks for a BLAST alignment between the component sequences, and if none is found, goes on to perform a banded global alignment. As the alignment is performed locally, repeat filtering is only available to external users if the repeats for the components have also been loaded locally.
Step 4: Viewing the Alignment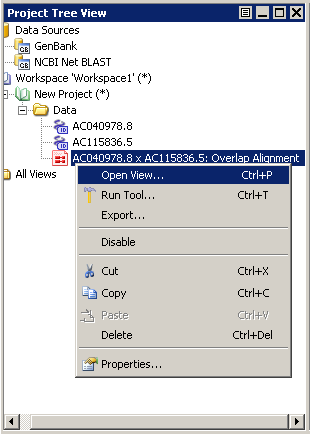

Select the alignment icon in the Project Tree. To view this alignment right click on the alignment, and choose Open View. Then from the Open View dialog choose Multi-pane Cross Alignment View. You will see a view like the one shown below. This viewer packs three views together - a Dot Matrix view of the alignment, and two Graphical Views, one on each sequence. Each view can be resized by clicking and dragging on its edges.
Resize the panels to match the image shown. In this composite view, you should see a dot matrix view on left and two graphical views stacked vertically on the right.
The dot matrix view shows a single diagonal line that represents the alignment. Sequence 1 is on the X-axis and Sequence 2 is on the Y- axis. The negative slope of the line indicates the two sequences align in opposing orientations.
The top graphical window shows Sequence 1 as the master sequence with Sequence 2 aligned beneath. In contrast, the bottom graphical window shows Sequence 2 as the master sequence with Sequence 1 aligned beneath. Features annotated on the master sequences, such as repeats, variations and annotations, are visible in the graphical views. It is necessary to scroll down past these features to see this alignment in the top graphical view. A pop-up window containing additional information will open when the mouse is held over any alignment or feature.

Step 5: Taking a closer look

For a closer view of the alignment, double click on the purple alignment bar in either graphical view. Within each window, this will zoom in to the level of the alignment. Selecting an alignment in one window highlights the same alignment in the other window. The selected region is also highlighted in the dot matrix view. Tick marks within the alignment bars in the graphical views indicate unaligned sequence, such as gaps and mismatches.
You can see these alignment details by increasing your zoom. In this example, zooming in on the lower graphical window reveals a single base pair indel in the alignment at Sequence 2 position 103,981. A known variation associated with an adjacent base is also shown.

Step 6: Additional Views: Selection Inspector
The Selection Inspector provides a summary of the alignment in tabular format, including information such as length and mismatch and gap counts. To see this view, select the Selection Inspector if it's visible, or choose View -> Selection Inspector from the main menu. In the drop down menu, choose the item that corresponds to the Multi-pane Cross Alignment View.

Step 7: Additional Views: Alignment Span View
The Alignment Span Table View provides information about each segment of an alignment. In the case of a discontinuous alignment (such as the one in this tutorial), information about each segment of the alignment is represented in its own row. To see this view, select the alignment icon in the Project Tree and choose View->Open View and choose Alignment Span View from the dialog. Or right click on the alignment and choose Open View and then choose Alignment Span View from the dialog. When this view opens, right-click in the table and select Settings, and set the threshold to 500.

Step 8: Exporting Alignments
Alignments can be exported from Genome Workbench in a couple of formats. For the purposes of submission to NCBI, alignments should be exported in ASN.1 format.
In the graphical view, select an alignment and choose File-> Export from the main menu. A dialog box will open. From the list menu on the left side of this box, select ASN File. Choose one or more of the alignments (control (or shift) click for multiple selection). Choose a file name by clicking the small box labeled ... to select the file destination. Select Text for the ASN type and click Finish.

Step 9: Finished
Congratulations! You now know how to perform a basic alignment between two DNA sequences in order to find a dove-tail overlap. You have also learned several ways to view alignments, and how to export an alignment from Genome Workbench.
Download
Current Version is 2.6.0 (released August 31, 2012)
- Release Notes
- Windows
- Mac OS X
- Linux (Ubuntu 10.04 LTS (Lucid Lynx))
- Source
- Older Versions