| * |
|
Nano-Structured Optics for Measuring Spherical Surfaces with Large Radii
Summary:The goal of this project is to solve the problem of measuring the form error and radius of spherical optical surfaces with large radius of curvature through the innovative application of nano-structured optics. Examples of such optical surfaces are mirrors in beamlines and imaging systems, and test plates for evaluating lenses. These surfaces are difficult to measure with conventional optical tests. Description:The interferometric nodal bench method is commonly used to measure the radius of curvature of a spherical optical surface. The method is difficult to apply to surfaces with radii exceeding a few meters because it requires the test part to be moved over a distance equal to its radius. The large cavity between reference surface and artifact furthermore increases uncertainties in the measurement of both radius and sphericity.
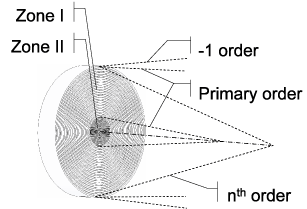
In the new method proposed by NIST, the transmission sphere that focuses the optical test beam is replaced with a twin-Fresnel zone plate, a nano-structured optical element. The zone plate generates beams with two different primary focal lengths. The two focal lengths are chosen to enable radius of curvature measurements that only require a small displacement of the artifact, and allow for a small cavity between artifact and reference. The technical plan of the project consists of the following components: (1) design of the twin-Fresnel zone plate; (2) manufacturing of the twin-Fresnel zone plate using semiconductor and nano-fabrication equipment; (3) development of inspection methods to validate the wavefronts generated by the twin-Fresnel zone plate; (4) development of standards-compliant uncertainty statements for measurements obtained with the new method; and (5) application of the zone plate to measure the radius of curvature of a surface and comparison of the measurement results with those obtained by the traditional nodal bench method. Major Accomplishments:
|
 Nested zone plate with two primary focal lengths to measure the radius of curvature of a mirror with a 10 meter radius. Start Date:February 1, 2008Lead Organizational Unit:pmlStaff:Johannes A. Soons, Program Manager Related Programs and Projects:Contact
Physical Measurement Laboratory (PML) |

