Windows ASR Services
You can provision a Windows virtual server automatically, in just a few minutes, if you are an established CIT hosted customer and registered to use ASR. Note: ASR will not display the options to request a virtual server unless you are already a CIT-hosted customer.
Log in to ASR using one of the following options:
Steps for Provisioning
- Once you have logged into ASR, select Initiate Request.
- Choose your application from the drop-down list and press Submit.
- Select Windows as the type of service.
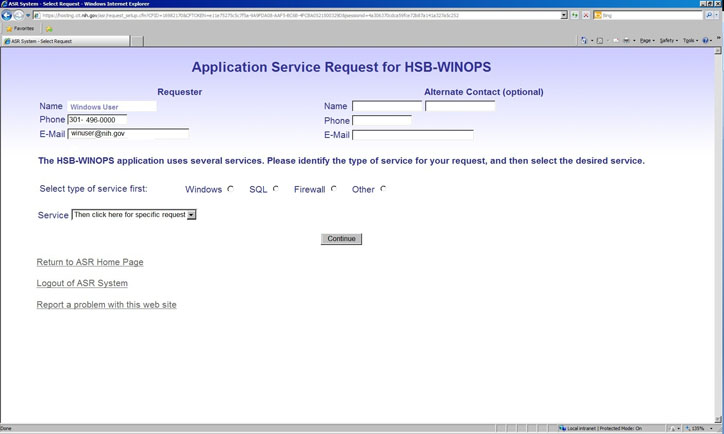
Sample Screen Shot 1
- From the Service drop-down menu, select New Virtual Server and click Continue.
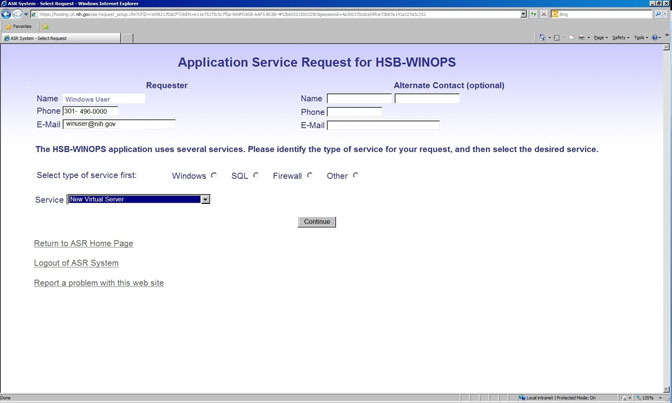
Sample Screen Shot 2
- At the next screen, fill in the following fields:
- Location – choose either Building 12 or Sterling
- Server Name - enter the NETBIOS name for the server (15-character limit)
- Custom template name – if you have a template hosted with Windows Hosting, then you may specify the template name instead of an operating system.
- Server Operating System – choose from the drop-down menu
- Server Description – enter a brief description of how the new virtual server will be used
- VLAN Assignment – choose from the drop-down menu. If you do not specify a VLAN, the default will be used.
- Number of CPUs – choose from the drop-down menu
- RAM – choose from the drop-down menu
- Dependent Systems – list specific hosts, firewalls, load balances, etc.
- Additional Storage – you may add storage to the standard storage provided for the D drive or add an additional drive lettered E
- Applications – select the applications you require. For a multiple server SharePoint farm, enter the
number of web front-end servers and number of application servers.
- Comments – fill in the form if necessary
- Once you have filled in all the fields, click the Submit Request button.

Sample Screen Shot 3
- Note: Once you have provisioned the virtual server, CIT releases it to the customer with a notice that software patches will be installed within the next 2 hours. CIT may reboot the server at any time during the 2-hour window.
Remember that you may still need additional time to prepare your server for production (e.g., software installation and testing).
Charging Adjustment
Whenever there is a change in resources, such as an increase in the number of servers, there will be an appropriate adjustment to the charges on the CIT account. When the SLA is renewed the following year, it will be amended to reflect the changes. The CIT hosting storage rates are listed at http://www.cit.nih.gov/ServiceCatalog/DataCenterRates.
Server owners or their designated application users can decommission a virtual or physical Windows server almost immediately through the ASR system.
Login to ASR using one of the following options:
Steps for Decommissioning
- Once you have logged into ASR, select Initiate Request.
- Choose your application from the drop-down menu and press Submit.
- Select Windows as the type of service.
- From the service drop-down menu, select Decommission Server and press Continue.
- At the next screen, fill in the following fields:
- Server Name – enter the NETBIOS name
- Location – choose either Building 12 or Sterling
- Type of Server – select virtual from the drop-down menu
- Comments – fill in the form if necessary
- Once you have filled in all the fields, click the Submit Request button.
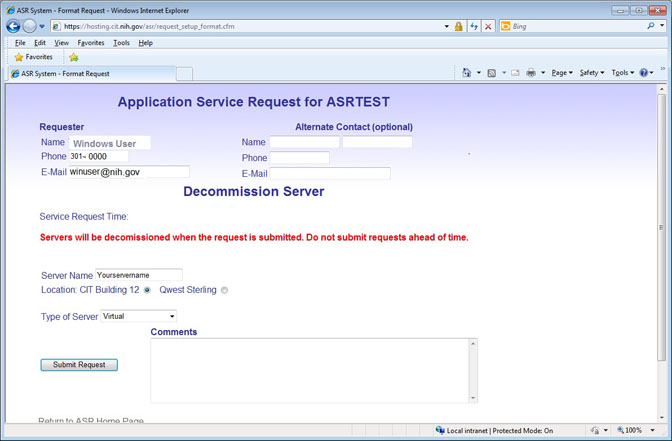
Sample Screen Shot 4
Note: Once you submit a request, the server will be decommissioned almost immediately, so do not submit a request until you are ready. CIT keeps a backup of the server for 30 days before permanent deletion.
Server owners or their designated application users can request a hardware upgrade for a virtual Windows server almost immediately through the ASR system.
Login to ASR using one of the following options:
Steps for Upgrading Hardware
- Once you have logged into ASR, select Initiate Request.
- Choose your application from the drop-down menu and press Submit.
- Select Windows as the type of service.
- From the service drop-down menu, select Hardware Upgrade Request and press Continue.
- At the next screen, fill in the following fields:
- Server Name – select a server name from the drop-down menu
- Location – choose either Building 12 or Sterling
- Type of Server – select virtual from the drop-down menu
- Amount of additional RAM – select the amount of RAM to add to the server
- Number of additional CPUs – select the number of additional CPUs to add to the server
- Storage – specify the drive letter that needs upgrading and the amount by which to upgrade the drive
- Comments – fill in the form if necessary
- Once you have filled in all the fields, click the Submit Request button.

Sample Screen Shot 5
Note: Once you submit a request, for virtual servers, the process is automated and you will receive an email once the request is completed.
Server owners or their designated application users can request a virtual server snapshot for a virtual Windows server almost immediately through the ASR system.
Login to ASR using one of the following options:
Steps for Requesting a Virtual Server Snapshot
- Once you have logged into ASR, select Initiate Request.
- Choose your application from the drop-down menu and press Submit.
- Select Windows as the type of service.
- From the service drop-down menu, select Virtual Server Snapshot Request and press Continue.
- At the next screen, fill in the following fields:
- Select the location of the VM – Choose either Building 12 or Sterling from the drop-down menu.
- VM you want to take a snapshot of – Select a server name from the drop-down menu.
- Specify the number of days – Enter the amount of days you would like to keep the snapshot (30 days maximum retention).
- Comments – Enter any details or special instructions if necessary.
- Once you have filled in all the fields, click the Submit Request button.

Sample Screen Shot 6
Note: Once you submit a request, for virtual servers, the process is automated and you will receive an email once the request is completed. Snapshots are automatically deleted after 30 days.
Server owners or their designated application users can request to clone a Windows VM server almost immediately through the ASR system.
Login to ASR using one of the following options:
Steps for Cloning a VM Server
- Once you have logged into ASR, select Initiate Request.
- Choose your application from the drop-down menu and press Submit.
- Select Windows as the type of service.
- From the service drop-down menu, select Clone Virtual Server and press Continue.
- At the next screen, fill in the following fields:
- Location – choose either Building 12 or Sterling
- Server Name to Clone – select a server name from the drop-down menu
- Would you like this clone to be used as a custom template – select yes or no (if yes is selected, the clone will be turned into a custom template that can be used in the New Virtual Server ASR form)
- Comments – fill in the form if necessary
- Once you have filled in all the fields, click the Submit Request button.

Sample Screen Shot 7
Note: Once you submit a request, for virtual servers, the process is automated and you will receive an email once the request is completed. Custom templates are automatically deleted after 30 days. The custom template name will be emailed to the requester and may be specified in the New Virtual Server ASR form.
Server owners or their designated application users can request to rollback a Windows VM server almost immediately through the ASR system.
Login to ASR using one of the following options:
Steps for Rolling a Server Back to a Snapshot
- Once you have logged into ASR, select Initiate Request.
- Choose your application from the drop-down menu, and then click Submit.
- Select Windows as the type of service.
- From the service drop-down menu, select Virtual Server Rollback To Snapshot Request, and the click Continue.
- At the next screen, fill in the following fields:
- Location – Choose either Building 12 or Sterling.
- Server Name to Clone – Select a server name from the drop-down menu.
- Enter snapshot name – Enter a valid snapshot name (A valid snapshot name must exist the hosting environment in order for you to rollback to that snapshot. Please verify snapshot name before submitting ASR).
- Comments – Fill in the form if necessary.
- Once you have filled in all the fields, click the Submit Request button.

Sample Screen Shot 8
Self-Service FAQ for Windows Servers
Q: Which Windows services are automated processes?
A: The Windows team has been steadily automating Windows VM ASR services to improve overall efficiency. This means that some services for virtual servers are automated from submission of ASR to completion. Currently the services that are automated are:
- New Virtual Server Request (if you are an established CIT hosted customer)
- Decommission Server Request
- Virtual Server Hardware Upgrade Request
- Virtual Server Snapshot Request
- Clone Virtual Server Request
Q: I have submitted an ASR for a Windows service that is automated. When will the automation start and how long will it take to finish? How will I know when it is done?
A: Currently automation is scheduled to run every half hour. Most requests will be completed within one hour of ASR submission. An email will be sent to the ASR submitter once the automation has finished with the ASR request.
Q: How long will I be able to keep a virtual machine (VM) snapshot or VM template?
A: Currently snapshots and templates created with the ASR system are removed automatically after 30 days (maximum retention). Server and VM patching occurs on a monthly basis and any templates or snapshots older than 30 days start to become non-compliant with patches. You may submit another ASR for a new snapshot to obtain a new baseline as the 30-day retention window approaches.
Q: I would like to create a new VM based on a current VM we have in the Windows hosting environment.
A: To create a new VM based on a current VM, you will need to submit a clone virtual server ASR and specify that you want to turn the clone into a custom template. After the custom template is created you will receive an email that includes the custom template name. You can then submit an new virtual server ASR specifying the custom template name instead of the operating system name. A new virtual server will be provisioned based on your custom template.
Q: If I submit a clone virtual server ASR will there be any interruption to my production server?
A: The cloning of a virtual server happens seamlessly and does not cause production server issues.
Q: What is a virtual machine snapshot?
A: A virtual machine snapshot is a file-based representation of the state of a virtual machine at a given time. The snapshot includes configuration and disk data. Snapshots are useful for storing states that an administrator might want to return to repeatedly.
Q: What is a template?
A: A template is a base image that is used as a model to provision new virtual machines (VMs) from. A template can have all the desired software application and configurations pre-loaded, then multiple new VMs can be created using this template.
Q: How long will I be able to keep a virtual machine (VM) snapshot or VM template?
A: Currently snapshots and templates created with the ASR system are removed automatically after 30 days (maximum retention). Server and VM patching occurs on a monthly basis and any templates or snapshots older than 30 days start to become non-compliant with patches. You may submit another ASR for a new snapshot to obtain a new baseline as the 30-day retention window approaches. Per VMware best practices, snapshots should not be used as a backup method, should be kept for no longer than 72 hours, and a VM should not have more than 3 snapshots assigned at any one time.