Network Access for NIEHS Staff
The NIEHS Intranet site is available only to personnel registered as NIEHS users with valid NIH user IDs.
If you need to access the NIEHS Intranet site but are unable to, please request that your supervisor, project officer or collaborator (as applicable) pursue access for you through their administrative officer (AO) and their computer support person (CSP).
The NIEHS Internet site is available for use by everyone.
Remotely Accessing NIEHS Resources
- 1. NIEHS Email
- 2. Library Journals and Databases
- 3. The Junction
- 4. Request Remote Access to NIEHS
- 5. Install Badge Reader and Associated Software "ActivClient"
- 6. Install Cisco AnyConnect VPN Software
- 7. "Self Serve" Installation of Cisco AnyConnect VPN Software
- 8. How to Login to VPN With Your SmartCard
- 9. Frequently Asked Questions
- 10. Download Quick Guide

2. Library Journals and Databases
NIEHS employees can access library journals and databases from home or while on travel by the following options:
If you have a government-issued computer, you can access journals and databases through your VPN connection (see "Request Remote Access").
Using a non-government computer, you can access journals and databases through:
- The Citrix connection (see "What is Citrix") and then going to Library Resources from the Junction.
- The NIH Library proxy server at http://ezproxy.nihlibrary.nih.gov/login
.
- Click the Next button in the Use NIH credentials box. The usual blue NIH login window will open.
- Enter in your User Name and Password, click Log in.
- Once you log in, the window will open the NIH Library home page.
- Under Quick Links, on the left hand navigation, are links to the Online Databases and Online Journals.
3. The Junction
To access The Junction, navigate to https://Citrix.niehs.nih.gov/ (https://citrix.niehs.nih.gov/).
When using Citrix Services, Remote Access Approval is not required and it is unnecessary to use VPN software.
What is Citrix?
Citrix is a means of accessing NIEHS applications such as Filemaker Pro, Adobe Acrobat, etc. through a fully functional virtual desktop environment. Citrix sessions transparently mimic nearly all every-day functionality for desktop computers. Citrix offers access to various applications and documents stored on NIEHS central storage without the need to create a VPN session. Some of the applications that are accessible via Citrix include but are not limited to Microsoft Office 2007/2010, Filemaker Pro and Internet Explorer 8.
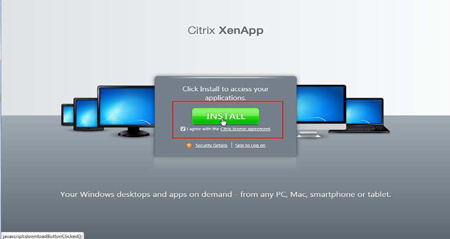
Multiple users can be logged into a Citrix Server simultaneously from various locations throughout the world. It is not necessary to use VPN software when using Citrix Services inside or outside the NIEHS network. Citrix access is provided through a web interface which requires a small plug-in, called the XenApp Plug-in, to be installed on the machine (administrative rights are required to complete the installation). Most NIEHS owned computers should have the plug-in installed on the computer by default. However, if the plug-in needs to be installed on the computer a Warning Notice will be visible "Click install to access your applications" (see below), as well as a button to download and install the plug-in.
How to use Citrix Services
To begin a Citrix session navigate to the following location https://Citrix.niehs.nih.gov/ . The Citrix Web Portal will check your computer for the compatible Citrix Client software otherwise known as the Citrix XenApp Plug-in. If the software is not found, the Citrix Web Portal will display a prompt to install the Citrix Online Plug-in through the following pop-up message. Place a checkmark in the “I agree with the Citrix license agreement.” box. Click the “Install” button to begin the installation process of the Citrix Online Plug-in.
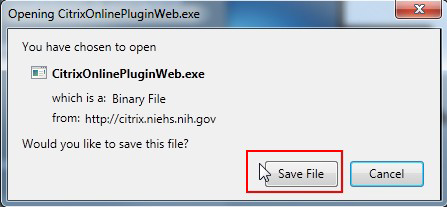
- The operating system will prompt to save the plug-in through the pop-up dialog box as shown below. Click the “Save File” button and the download and installation process will start.
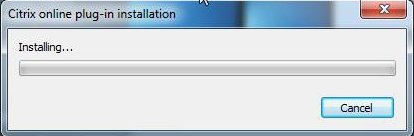
- The operating system will display the installation progress bar while the plug-in is being installed.
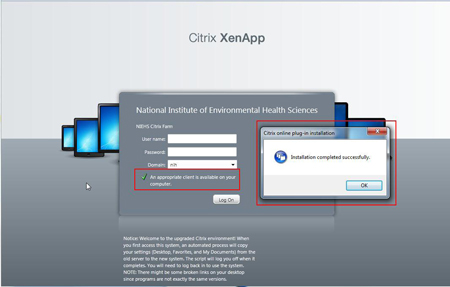
- Once the software is properly installed, another pop-up dialogue box will appear indicating that the Citrix Online Plug-in was successfully installed. Also, there will be a green check mark at the bottom of the log in area indicated that an appropriate client software is present on the computer as shown in the following screenshot.
Logging into the Citrix Web Portal
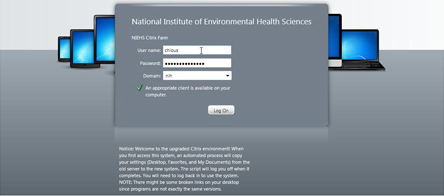
- To log into the Citrix environment, enter your NIH username and password in the proper fields, as shown in the highlighted area of the image below. Ensure that the Domain is NIH and click on the “Log On” button to proceed.
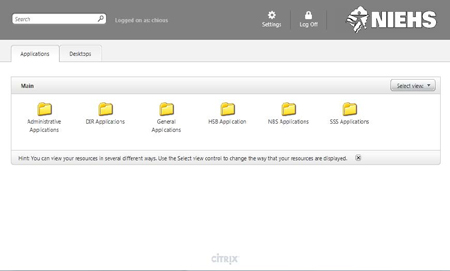
- The Citrix Web Portal screen (shown below) will appear once you have successfully logged in. To access the Citrix desktop, select the Desktops tab.
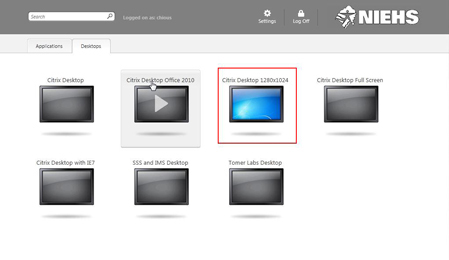
- To access the Citrix Desktop, click on one of the icons listed on the "Desktop" tab of the Web Portal. See below.
- The Citrix Online Plug-in will begin to launch the Citrix desktop, as noted on the "Citrix Desktop" dialog box. The government computer warning box can be seen in the background, as shown below.
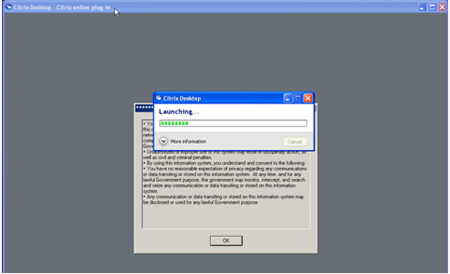
- After you have read the access restrictions, click the "OK" button on the "Warning" dialog box.
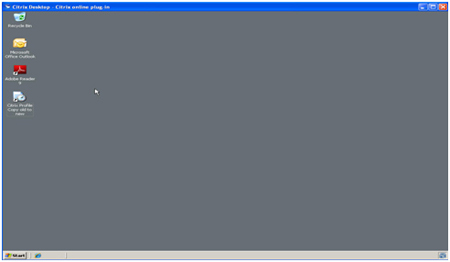
- Once you have logged in, the Citrix desktop environment is ready to use! You will have access to files you have stored on central storage as well as other network resources like email, printers, and group/project files stored on the central storage system.
4. Request Remote Access to NIEHS
All NIEHS employees who need Remote Access technologies must complete certain steps so that an account can be set up for you:
Step 1: Complete Required Training
Take the Mandatory NIH Secure Remote Access Training courses: http://irtsectraining.nih.gov/ . Before you take the training, you should be aware of several notes:
- The training application tracks which modules you have completed.
- To get credit for completing a module you must reach the last screen of the module.
- The course requires Real Player to view the animation and has audio. If you do not have audio, use the Show Text feature (found under the Audio button), or click through the program.
- The most ideal way to take the course is to use Internet Explorer (IE) as your browser. Mac users can access IE through Citrix.
- The one time primary course and one-time remote access course may be completed in 20-60 minutes, depending upon how much information you want to access.
- Even though you may print a certificate, it does not count as credit in the reporting system - the computer's database logs your activity for credit through the 'checkmarks' next to the login screen's notes.
- To see if you established official credit, leave the application and log back in to see the important 'checkmarks' next to each course and module.
- If you have trouble recording course completion (checkmarks), try a different Internet browser or computer.
Special Note: As this training is a federal requirement, NIEHS employees and support staff who do not choose to take the training will move through a sequence of personnel steps that involve their supervisors and position reviews. NIEHS users, including contractors, may have their computing privileges revoked if they fail to take the training.
Step 2: Sign User Certification Agreement
Electronically sign the one-time agreement to obtain remote access. Sign the form within the training (in Step 1, above) or sign it electronically here: http://cims.cit.nih.gov/nihforms.cfm?form=remote.access
Step 3: Complete Remote Access Application
Initial Request - If this is your first time requesting Remote Access:
- The Remote Access system resides on the secure NIEHS intranet. Use Citrix to access the secure system from anywhere you have Internet access. Simply surf to https://Citrix.niehs.nih.gov/ (https://citrix.niehs.nih.gov/) and login with your NIH username and password. Choose the “Applications” tab; open the “General Applications“ folder; and launch Internet Explorer. Use this instance of IE to surf to the Remote Access Application: http://process.niehs.nih.gov/bizflow/index.jsp (http://process.niehs.nih.gov/bizflow/index.jsp) .
The Welcome screen is shown below:

- Login to the application with your NIH userid and password. When you login, click the button that reads, "Initiate Remote Access Request."
- On the Remote Access Request Form verify your auto-populated profile information. If you find incorrect information contact your Administrative Officer (AO) prior to submitting your request.
- Check all boxes that apply to your remote access needs (e.g. "Telework," "Travel Requirements," etc).*
- On the header menu bar, ensure that “Submit Request” is selected in the drop down menu. Click "GO" as shown in the graphic below. This will prompt the system to ask for your NIH password, which serves as your electronic signature.

- You have completed your remote access request. Your request will be automatically routed to your supervisor or project officer for approval. When s/he reviews your request you will receive an email notification stating the status of your Remote Access privileges. In some cases the request may be denied or require rework. If so, please contact your supervisor for assistance.
Upon your Supervisor's approval your AO will update NED to grant you Remote Access Privileges. If you have not yet completed the required training (described in Step 1: Complete Required Training above) you will receive an email notifying you to take this training, with a link to the online course. This MUST be completed before the Remote Access Request privileges are granted.
Note: Your remote access request will auto-generate an IT Service Desk ticket letting technicians know that you are requesting or renewing your privileges. Please disregard the confirmation email you receive stating that the Service Desk has received your "request for support." The ticket will be noted by the technicians and closed, since no further action is required.
* Only Federal employees are granted Remote Access privileges based on "Telework" or "Flexi-space" requirements. Contractors are ineligible for remote access based on these two requirements.
5. Install Badge Reader and Associated Software "ActivClient"
If your system does not have a built-in badge reader, you will need an external badge reader that connects to your laptop with a USB cable. To request an external Badge Reader for a PC or Mac, please submit an IT Support Ticket to the Help Desk: http://itservicedesk.nih.gov or call 1-866-319-4357.
If you have a Mac, you will not need to install any software. Your Mac will automatically recognize your external badge reader when you plug in the USB cable.
If you have a PC, you will need badge reader software called "ActivClient" installed on your laptop.
- You must have admin privileges on your machine to install the badge reader software.
- Therefore, if you have a government furnished laptop, you should call the Service Desk since they have admin privileges and can install the software for you: http://itservicedesk.nih.gov or call 1-866-319-4357
- If you want to install the badge reader software on a personally-owned machine, you have admin privileges by default, and should follow the directions below to install "ActivClient:"
- Open badge reader software download site: http://smartcard.nih.gov/PKI_files/ActivClientWindowsInstructions.pdf
- Select ActivClient v6.2
- Instructions for installing your badge reader software: http://smartcard.nih.gov/PKI_files/ActivClientWindowsInstructions.pdf
- General information about the ActivClient badge reader software - http://smartcard.nih.gov/PIV_activclient.htm
6. Install Cisco AnyConnect VPN Software
Cisco AnyConnect VPN software enables you to establish a secure connection from a remote location to the NIEHS network and intranet resources that are normally only accessible from on-site.
If you have a government-furnished desktop/laptop, contact the Service Desk and a technician will come to your office to install the software, provide a badge reader, etc.to get you up and running: http://itservicedesk.nih.gov or 1-866-319-4357. You must have admin privileges on your machine to install the badge reader software, which is why you must request help from the Service Desk.
If you use personally owned equipment (soon to be prohibited by NIH) you may use the “self serve” instructions below to install the Cisco AnyConnect Software.
7. "Self Serve" Installation of Cisco AnyConnect VPN Software
You must have admin privileges on your computer to install this software. The following instructions are for personally owned equipment (POE). Keep in mind that POE will soon be prohibited to access the NIH/NIEHS network remotely.
PC/Windows Users:
- Surf to the NIH VPN Tools download site: http://isdp.nih.gov/isdp/version.action?prodid=140
- Click on the Operating System (OS) your machine uses (e.g. Windows XP, Windows 7, etc.).
- A drop down menu will appear. Click the link that reads, “New Cisco VPN client (for 2-factor authentication)”
- A popup File Download window will appear. Choose “Save” to download the .zip file that contains the AnyConnect software.
- Unzip the file you just downloaded titled “Windows-anyconnect-client.zip” and extract all files.
- Run the AnyConnect installation file by doubleclicking the icon.
- Follow the Wizard instructions to complete the installation of the AnyConnect software.
- You should now see the client in Start Menu / Programs / Cisco / Cisco AnyConnect VPN Client
Mac Users:
- Surf to the NIH VPN Tools download site: http://isdp.nih.gov/isdp/version.action?prodid=140
- Click on the Operating System (OS) your machine uses (e.g. Mac OS X).
- A drop down menu will appear. Click the link that reads, “New Cisco VPN client (for 2-factor authentication)”
- A popup File Download window will appear. Choose “Save” to download the .zip file that contains the AnyConnect software.
- Unzip the file you just downloaded titled “MACOS-Anyconnect-client.zip” and extract all files.
- Run the AnyConnect installation file by doubleclicking the icon.
- Follow the Wizard instructions to complete the installation of the AnyConnect software.
- You should now see the client Cisco AnyConnect VPN icon in Applications/Cisco folder.
8. How to Login to VPN With Your SmartCard
PCs/Windows Users:
Watch the online tutorial: http://itsolutionscenter.cit.nih.gov/selfservice/viewContent.do?externalId=19398&sliceId=2
- Launch the Cisco AnyConnect VPN Client from the Start menu in Windows: Start/Programs/Cisco/Cisco AnyConnect VPN Client. Do not insert your badge yet.
- Once you receive the Cisco AnyConnect VPN Client pop-up menu shown below, choose the niehs-remoteacessvpn.niehs.nih.gov option in the Connect to: box and click Select.
Note: There are typically four options in this window.- niehs-onsitewirelessvpn.niehs.nih.gov: used for accessing on-campus NIEHS wireless network.
- niehs-remoteaccessvpn.niehs.nih.gov: used for working remotely and accessing the NIEHS network.
- onsitewirelessvpn.nih.gov: used for accessing on-campus NIH wireless network.
- remoteaccessvpn.nih.gov: used for working remotely and accessing the NIH or NIEHS network.
- If your menu options do not include niehs-remoteaccessvpn.niehs.nih.gov as indicated above, please contact the Service Desk for assistance: http://itservicedesk.nih.gov or 1-866-319-4357.
- Once prompted, insert your ID Badge into the computer's badge reader.
- Once the ID Badge is inserted, you will be prompted for your personal identification number (PIN).
- Enter your PIN and click the OK button. If the connection is successful, you will see an icon in the lower right corner of your computer screen (in the taskbar), confirming the client is connected.
- To disconnect from Remote Access, right click on the AnyConnect icon in the task bar and select Disconnect on the Connection tab of your AnyConnect software.
Mac Users:
Watch the online tutorial: http://itsolutionscenter.cit.nih.gov/selfservice/viewContent.do?externalId=19398&sliceId=2
- Insert your Smart Card ID Badge into the computer's badge reader.
- Launch the Cisco AnyConnect VPN Client: ;Go to Applications, then the Cisco folder, then double-click the Cisco AnyConnect VPN Client.
- Once you receive the Cisco AnyConnect VPN Client pop-up menu, choose the niehs-remoteacessvpn.niehs.nih.gov option in the Connect to: box and click Select.
Note: There are typically four options in this window.- niehs-onsitewirelessvpn.niehs.nih.gov: used for accessing on-campus NIEHS wireless network.
- niehs-remoteaccessvpn.niehs.nih.gov: used for working remotely and accessing the NIEHS network.
- onsitewirelessvpn.nih.gov: used for accessing on-campus NIH wireless network.
- remoteaccessvpn.nih.gov: used for working remotely and accessing the NIH or NIEHS network.
- If your menu options do not include niehs-remoteaccessvpn.niehs.nih.gov as indicated above, please contact the Help Desk for assistance: http://itservicedesk.nih.gov or 1-866-319-4357.
- Enter your personal identification number (PIN) and click the OK button.
- Read the Warning banner and Accept. You are now connected to Remote Access.
- To disconnect from Remote Access, click on the Disconnect button on the Connection tab of your AnyConnect software.
9. Frequently Asked Questions
How Do I Renew my Smart Card Digital Certificates?
You will receive an e-mail notification from the HHS six weeks before the digital certificates embedded in your smart card expire. If your digital certificates expire, you will not be able to use your smart card until you renew your certificates.
- You can renew your certificates right from your desktop using the ‘Access Card Utility’ (ACU) 42 days prior to expiration through the actual expiration date (noted in email alerts you’ll receive from HHS when it’s time to renew). This tool should already be installed on your computer, and is listed on the ‘Start’ menu under ‘All Programs.”
- If your certificates have expired, visit the NIEHS Security Office and a Security Issuance Official will renew the digital certificates loaded in your smart card. The NIEHS Security Office is located in Building 101 (Rall Building), Room B114A. Please schedule an appointment during the hours of 8:00am – 4:00pm by contacting the Security Office at 919-541-7515 or fac-security@niehs.nih.gov. The appointment will take 20 minutes. Remember to bring your badge with you!
What if I forgot my PIN?
Visit the NIEHS Security Office and a Security Issuance Official will help you reset your PIN. The NIEHS Security Office is located in Building 101 (Rall Building), Room B114A. Please schedule an appointment during the hours of 8:00am - 4:00pm by contacting the Security Office at 919-541-7515 or fac-security@niehs.nih.gov. The appointment will take 10-15 minutes. Remember to bring your badge with you!
10. Download Quick Guide
Download this .pdf file and save it directly to your laptop. You’ll have easily accessible step-by-step instructions when you need to use Smart Card login for VPN access to the NIH/NIEHS network! Smart Card VPN Login Quick Steps (171KB)