FAQs
"How to use our tool"
How do I...
- Choose categories (change rows and/or
columns) in my report?
- Choose measures (data cells) in my report?
- Drill down and drill up on categories
(rows and/or columns) in my report?
- Filter the data in my report?
- Nest categories (rows and/or columns) in
my report?
- Choose a display (crosstab/charts)?
- Show report values (e.g. measure =
employment) as percentages?
- Sort values in my report?
- Suppress values in my report?
- Export data in CSV file format (Excel)?
- Export data in PDF format (Adobe
Acrobat)?
- Print reports?
Q1: How do I
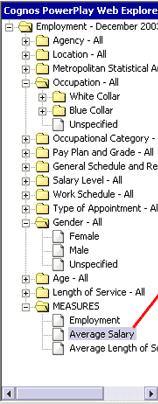
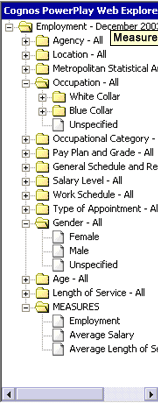
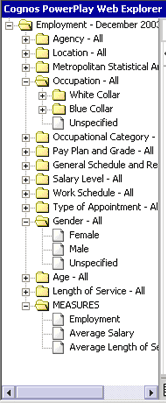
choose categories (change rows and/or columns) in my report?
Steps
-
In the dimension viewer,
expand the dimensions to locate the category you want to
show in the display.
-
Click the category (e.g. Gender - All), and
then drag it to the row heading area or the column heading
area.
Tips
-
You can also right-click the
category in the dimension viewer, and then click either
Replace Rows or Replace Columns.
-
To choose categories from the
dimension line, click the dimension in the dimension line,
and then click the category you want to show in the
display.

Q2: How do I choose measures (data cells) in my report?
Steps to Change the Measure Used
- In the dimension viewer,
expand the Measures folder to locate the measure you want
to show in the display.
- Click the measure, and
then drag it to the Measure heading area in the display.
Tip
- To use the dimension line to
change the measure used, choose one of the following
options:
- Click Measures in the
dimension line, and then click the measure you want to
show in the display.
- Click Measures in the
dimension line, and then drag the measure to the
Measure heading area in the display.
Steps to View All Measures
- In the dimension viewer,
right-click the Measures folder, and then click either
Replace Rows or Replace Columns.
Q3: How do I drill down and drill up on categories (rows and/or columns) in my report?
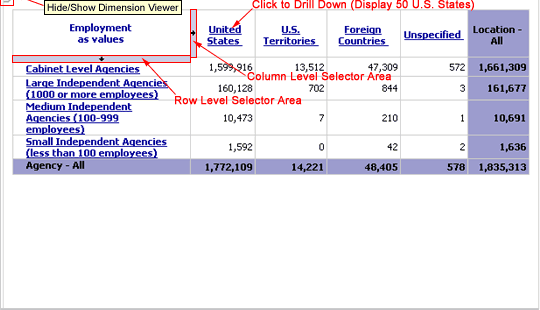
Steps to Drill Down
- To drill down a level within one
category in the FedScope display, click the column
heading link.
The next level categories replace the column headings in the
display.
Tips
- To drill down using the dimension
viewer, choose one of the following options:
- Right-click the next level
category in the dimension viewer, and then click
either Replace Rows or Replace Columns.
- In the dimension viewer,
expand the dimension to locate the next level category
in the dimension, click the next level category, and
then drag it to the column heading area or the row
heading area.
- To choose a category level from
the dimension line, click the dimension, and then click
the lower-level category you want to show in the display.
- To drill down a level across all
categories in the FedScope display, right-click the
column or row level selector area, and then click Down a
Level.
Note: The column level selector area is
located to the immediate right of the first column heading
area. The row level selector area is located immediately
above the first row heading area.
Steps to Drill Down Multiple Levels
- In the dimension viewer,
expand the dimensions to locate the category level you
want to show in the display.
- Click the category
level, and then drag it to the column heading area or the
row heading area.
Tips
- You can also right-click the
category level in the dimension viewer, and then click
either Replace Rows or Replace Columns.
- To drill down multiple levels from
the dimension line, click the dimension, and then pause
the pointer on the next category level to expose the next
level of categories. Continue to expose the lower-level
categories, and then click the category level you want to
show in the display.
- To drill down multiple levels in
the FedScope display, click the column heading links
until you reach the category level you want to show in the
display.
- In crosstab displays, you can
double-click a data value to drill down directly to the
categories associated with the value.
Steps to Drill Up
- In the dimension viewer,
locate the category level you want to show in the display.
- Click the category
level, and then drag it to the column heading area or the
row heading area.
Tips
- You can also right-click the
category level in the dimension viewer, and then click
either Replace Rows or Replace Columns.
- To drill up from the dimension
line, click the dimension, and then click the category
level you want to drill up to.
- To drill up a level in the FedScope display, right-click the column or row level
selector area, and then click Up a Level.
Note: The column level selector area is
located to the immediate right of the first column heading
area. The row level selector area is located immediately
above the first row heading area.
- To drill up to parent row and
column categories, double-click the data value where the
row and column intersect.
Q4: How do I filter the data in my report?
Steps
- In the dimension viewer,
locate the category you want to filter on.
- Right-click the
category, and then click Filter.
The filtered category
appears bolded in the dimension line and, in the display, the
values change to reflect the filtered category.
Tips
- To add a filter from the dimension
line, click the dimension, and then click the category you
want to filter on.
- To remove a filter, click the
filtered category in the dimension line, and then click
the dimension level.
- To remove all filters from all
dimensions, click the Reset Dimensions
 button on the dimension line.
Q5: How do I nest categories (rows and/or columns) in my report?
Steps to Nest Categories
- In the dimension viewer,
locate the category you want to nest in the display.
- Right-click the
category, and then click either Nest Rows or Nest Columns.
The nested category
appears in the display as sublevels within the row or column
category.
Tips
- You can also click the category
you want to nest in the dimension viewer, and then drag it
to the row nest level area or the column nest level area.
As you drag the category over the nest level area, the area
becomes highlighted.
Note: The row nest level area is located in
the far right of the row heading area. The column nest level
area is located at the bottom of the column heading area.
- To nest a category from the
dimension line, click the dimension, locate the category
you want to nest, and then drag it to the row nest level
area or the column nest level area.
Steps to Remove Nested Categories
- In the FedScope display,
right-click the level selector area for the nested
category, and then click Delete.
Note
- For nested categories, the level
selector area is located to the immediate left of nested
column categories and immediately above nested row
categories.
Tip
- To use the level selector toolbar
to remove a nested category, click the level selector area
for the nested category. On the level selector toolbar,
click the Delete
 button.
Q6: How do I choose a display (crosstab/charts)?
Steps
Crosstabs
- Click the Crosstab flyout menu
 on the FedScope toolbar, and then click Crosstab or
Indented Crosstab.
on the FedScope toolbar, and then click Crosstab or
Indented Crosstab.
Charts
- Click the Chart flyout menu
 on the FedScope toolbar, and select a Chart type (e.g.
simple bar, pie, clustered bar, stacked bar, multiline, 3D
bar).
on the FedScope toolbar, and select a Chart type (e.g.
simple bar, pie, clustered bar, stacked bar, multiline, 3D
bar).
Tip
- To modify a display type, on the FedScope toolbar, click
the Display Options
 icon.
icon.
Q7: How do I show report values (e.g. measure = employment) as percentages?
Steps
- In the FedScope display,
right-click the Measure heading, and then click a
percentage data format.
Tip
- You can also click the Display
Options
icon on the FedScope toolbar and then, in the
Display Measures box, select a percentage data format.
Q8: How do I sort values in my report?
Steps
- In the FedScope display, select the row or column in which you want to
sort the values.
The row or column becomes highlighted, and the Sort  icon appears in the row or column heading.
- Click the Sort icon, and
then choose the order in which you want to sort:
- Click Sort Descending to sort
the values in descending order.
- Click Sort Ascending to sort
the values in ascending order.
The values and the Sort icon change to show the type of sort
action that you applied to the row or column.
Tip
- To remove the value sorting, click
the Sort icon, and then click No Sort.
Q9: How do I suppress values in my report?
Steps to Apply Zero Suppression
- On the FedScope toolbar,
click the Zero Suppression
 icon.
icon.
All rows and columns that contain only zeros are removed,
and FedScope shows "Zero suppression" at the
bottom of the report page.
Steps to Apply 80/20 Suppression
- On the FedScope toolbar,
click the 80/20 Suppression
 icon.
icon.
FedScope shows the total of values suppressed in an
additional row or column called "Other" and shows
"80/20 suppression" at the bottom of the report
page. If a category labeled "Other" is not shown,
all the categories in the report dimension contribute to
eighty percent of the total.
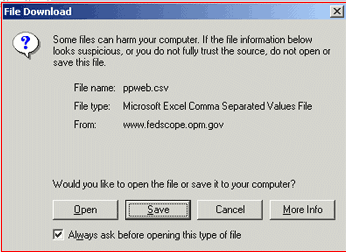
Q10: How do I export data in CSV file format (Excel)?
Steps
- Explore and format your
report until you are satisfied with its current state.
- On the FedScope toolbar, click
the File flyout menu,
 and then click Export CSV.
You are prompted to open the file or save it to your
computer.
Q11: How do I export data in PDF format (Adobe Acrobat)?
Steps
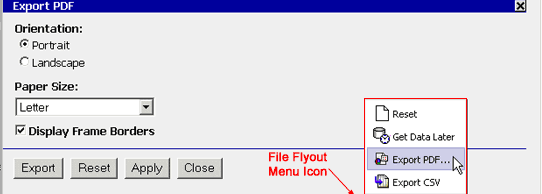
- On the FedScope toolbar, click the File flyout menu,
and then click Export PDF.
- In the Orientation
field, click either Portrait or Landscape.
- In the Paper Size box,
select the size you want.
- If you want to show the
borders for crosstab and chart frames, select the Display
Frame Borders check box.
- Click Apply.
Tips
- The settings are changed
throughout the current browser session even if you don't
export a PDF file. If you don't click Apply, the settings
are applied to only the current PDF export.
- To revert to the default PDF
settings, click Reset.
- Choose one of the
following options:
- To save the PDF export
settings and return to the FedScope report, click Close.
- To export the PDF file with
the settings you chose, click Export.
Tip
- To return to your report in FedScope, click the Back button in your Web
browser.
Q12: How do I print reports?
Steps
- Export your report to PDF
- On the Adobe Acrobat Reader
toolbar, click the Print icon.
Note
- Do not use the Print command in
your Web browser toolbar to Print FedScope reports.
|